New Stock every week - Worldwide Shipping
New Stock every week - Worldwide Shipping

Teresa’s guitarbuild
November 29, 2014 3 min read 5 Comments
Teresa’s guitarbuild

Teresa has kindly sent in a short story to demonstrate the building process of her latest project:
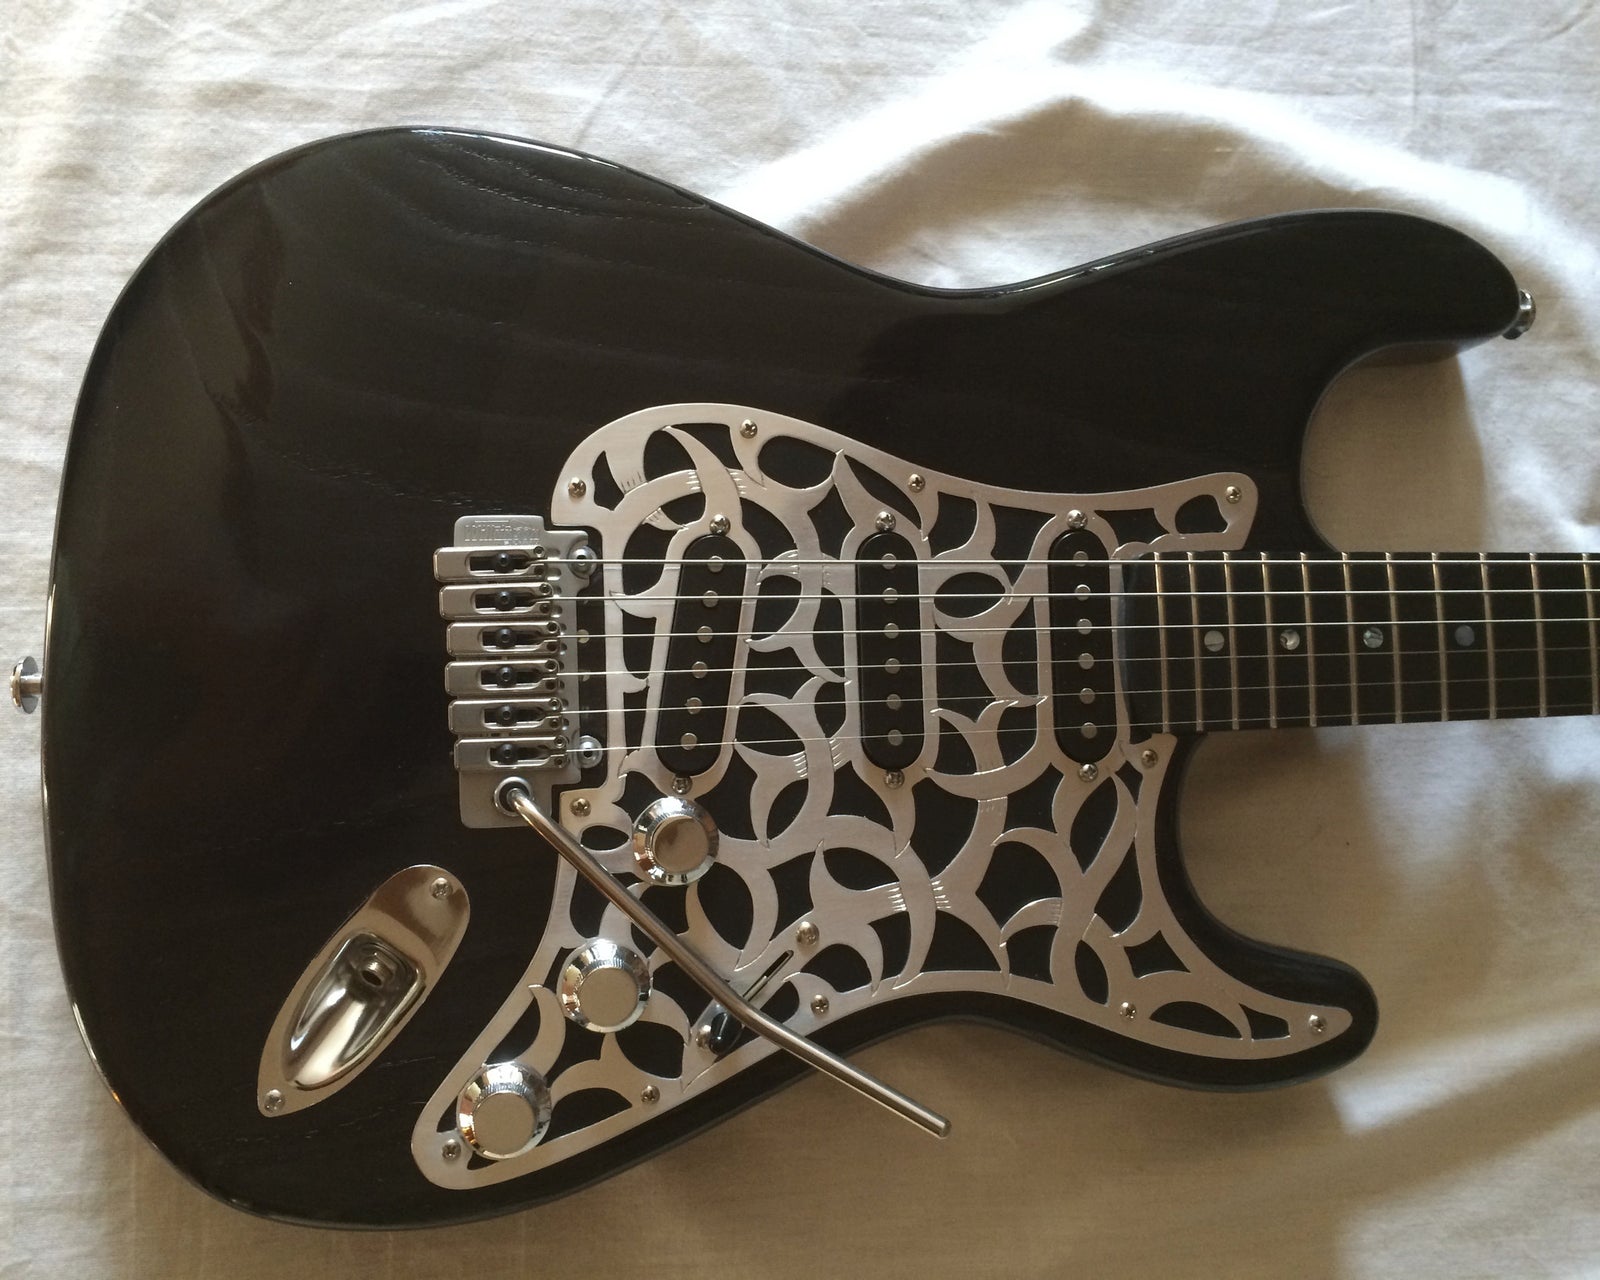
Tech specs: This was my first guitar build project and I am sure my approach was far from that of a professional, but here's what I did to the body: I made a couple of decisions at the outset of the project which affected the approach I took. They were that I was going to use a modern 2 point tremolo, so in some way I had to fill the 6 pre-marked vintage style holes and secondly I decided that I wanted to preserve both the feel and visibility of the swamp ash grain texture so I decided I would not grain fill and that I would use a transparent colour. That decided, anything I did to the 6 tremolo holes was going to show through the finish, so rather than try to disguise them, I decided to make a feature of them. I inlayed abalone shell to the inner 4 holes and drilled out the outer holes for a 2 point tremolo. I could then move straight to sanding. I sanded by hand to 1200 grit using wet and dry paper (dry) and then stained the wood using a transparent solvent based light fast black stain which I applied using a rag. Although this dried almost instantly I waited a few days for decent weather before applying a finish. I didn't have access to a spray booth or spray equipment, so I decided to use rattle cans in the garage. I set up a little workbench and I should mention a device I obtained from StewMac that they call a "freehand holder". This allows you to attach a body or neck, suspended over your bench and on which you can rotate the piece while you spray. It was invaluable. I sprayed 3 coats (1 coat being 3 passes) of nitrocellulose sanding sealer, allowing an hour between coats. I followed this with 9 coats of clear satin nitrocellulose. I obtained the nitro from Manchester Guitar Tech. The clear satin finish may seem an odd choice, but I wanted to emphasise the grain texture and felt that this would be best achieved by retaining a flat satin look in the lows, against which I hoped I could rub out the highs to a sufficient gloss as contrast. After spraying I waited an agonising 4 weeks before rubbing out, which I did by hand using a 4000 grit Abralon pad lubricated with water and a tiny drop of detergent. In order to take the satin clear coat to a glossy finish on the highs I polished by hand to 12000 grit using Micro-Mesh abrasive cloth, again lubricated with a very mild detergent solution. The final process was to buff with a little carnauba wax and lambswool pad.
To decorate !!! I used a Wilkinson Gotoh VS100 tremolo in satin chrome, matching this with Schaller staggered height satin chrome locking tuners at the other end of the string path. I installed Suhr V60LP pickups and used two push push tone pots to enable series, parallel and phase switching control. The beautiful pickguard and backplate were hand made for me by a metalwork artist Christianne Ertmer https://www.facebook.com/ertmermusic
I hope that's the sort of information you were after. I will soon make a start on the RG body you supplied at the same time as the Strat. Very much looking forward to making this, I feel I learned an awful lot in making the strat.
Best
Teresa


5 Responses
peter ciupa
December 06, 2016
The pickguard is AMAZING, The grain showing through the finish is superb and is set off by the metalwork, Here I am not far off 70 and still excited by cool stuff !!!!
Gerry Hector
March 15, 2016
Nice work beautiful axe.
Eoin Jennings
September 14, 2015
a very beautiful piece
the pickguard looks amazing
Suzy
June 21, 2015
Great work – the guitar looks TERRIFIC!
Leave a comment
Comments will be approved before showing up.
Subscribe
Sign up to get the latest on sales, new releases and more …


Stephen Lyons
November 13, 2018
Looks really good.Took a lot of patience.!..Would love to see and hold it .Not in London are you ?
Am doing an art project.What do you think about me repeating a similar process to you with Walnut
Thanks Theresa.
Best wishes
Steve.